Understanding process hazard analysis steps is crucial for implementing effective safety measures. Process hazard analysis (PHA) is one of the 14 elements of OSHA’s process safety management standard. But whether your processes fall under PSM or not, knowing the PHA steps is a helpful tactic for improving the safety and efficiency of your operations.
In this post, I’ll cover the process hazard analysis steps you should follow each time and explain what you should gain from this approach.
Process hazard analysis overview
It’s a thorough, orderly, systematic approach for identifying, evaluating, and controlling hazards in your company’s processes involving highly hazardous chemicals.
It involves breaking these complex processes down into individual tasks and assessing their overall risk level. The goal of process hazard analysis (PHA) is to find hazards and take steps to eliminate them.
Here are some questions that a PHA should help you answer:
- What are the various hazards within this process?
- Are there any process deviations that increase safety risks?
- How likely is each hazard to cause an incident?
- What is the overall risk level of each hazard identified?
- What are some corrective actions you can take to reduce or eliminate hazards?
- Is this process compliant with regulatory requirements?
Main outcomes of PHA
There are three main outcomes that you should get from following the process hazard analysis steps.
- Identify and assess safety risks
- Implement effective control measures
- Ensure regulatory compliance
A good process hazard analysis should reveal both significant and minor safety risks. The only way this exercise actually improves safety is if you follow up on your findings with a corrective action plan.
Process hazard analysis steps
In my experience, performing any sort of routine audit, inspection, or analysis is more effective when you do it the same way every time. Below are the steps I follow every time I do one myself.
Of course, you can come up with your own method for conducting PHA’s. Just make sure you keep it consistent so you can easily compare results over time.
Step 1: Clearly define the process
One mistake when doing a process hazard analysis is not clearly defining the process you’re reviewing. I find that it’s best to start by deciding exactly which tasks you want to analyze.
It’s important to include this in your PHA documentation. That way, anyone reading your analysis can understand the purpose and application of the work process.
Step 2: Pick an analysis method
The next step is to pick an analysis method. There are quite a few options here:
- Hazard and operability study (HAZOP)
- Failure mode and effects analysis (FMEA)
- Fault tree analysis (FTA)
- Root cause analysis (RCA)
- Layer of protection analysis (LOPA)
My personal favorite for finding hazards within a process is the HAZOP analysis method. What I like most about it is that it helps me account for all the deviations.
I also find that it’s not too complicated to document and doesn’t require a bunch of quantitative data or visuals to complete. [You can get the HAZOP analysis template that I use by clicking here].
You don’t have to use the same method each time. But it does help to have some go-to options that you are well-versed in and can complete efficiently. The great news is that once you do an FMEA, HAZOP, etc. a few times, it becomes like second nature.
Step 3: Perform the hazard analysis
The next step is to go out and perform your analysis. It’s important to get out on the floor to do this, so you can see the process in action. You want to be thoughtful during the hazard analysis, so you don’t miss anything important.
For me, I try to set aside at least two hours to do a PHA. This is almost always enough time, especially if it’s a process I know really well.
One important note is to make sure you explore as many process deviations as possible. This is the most time-consuming part of the analysis (in my opinion) because it can take a while to brainstorm how the process could change.
During your PHA, you should also assign a risk level to each hazard. You could treat this as a separate step, but I try to figure this out while I’m actually observing the process itself. That’s because it’s easy to over or underestimate the risk level when you’re in the back office.
So, I tend to record the hazard risk level in my actual analysis document. That way, I don’t have to think back about what I saw and try to figure it out then.
Step 4: Determine your corrective actions
Once you’ve finished your analysis, it shouldn’t be too hard to figure out improvements to make. Some will be obvious, but others will require you to collaborate with others.
If you can’t find anything to improve, you’ve probably not gone deep enough in your analysis.
Your corrective actions should cover both long-term and short-term hazard prevention strategies. Some examples of common action items following PHA’s include:
- Changing the order of tasks within a process
- Reorganizing the workstation or work area setup
- Introducing new tools or equipment
- Removing tools or equipment
- Adjusting training for the process
- Establishing new standard operating procedures
- Adding new safety measures like machine guarding or emergency stops
Step 5: Document your process hazard analysis
The final process hazard analysis step is to document your findings and corrective actions. You can use this checklist to review everything:
Free form!
Download this free process hazard analysis form to review your findings and corrective actions.
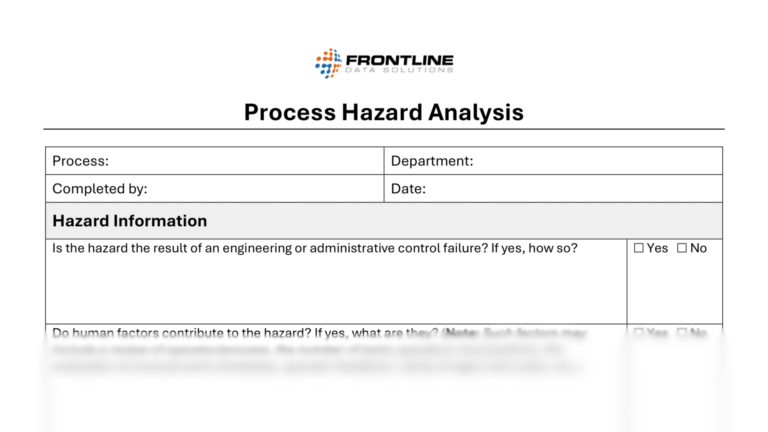
My best advice for documentation is to keep a fillable template that your team can use. That way, you’re recording the same types of details each time, so you can better compare PHA’s. Keeping detailed records not only makes it easier to track progress but also helps if you have to go through a regulatory inspection as well.


